FaceLCD Hong Kong Limited
Tel: +8615818692944
E-mail: sales@facelcd.com
Address: 13F, Buiding B, Colorful Tech Park, Guanlan High tech park, Longhua Dist, Shenzhen,China ZIP code 518100
You are here: Home > Technology >
Part 1: The LCD Touchscreen Origin Point: The Foundation of Precision
What exactly is the touchscreen origin point? In essence, it serves as the absolute zero reference point for the touchscreen's coordinate system. Think of it as the prime meridian on a map or the zero mark on a ruler. Within touchscreen technology, this origin provides a unique coordinate address for every single touch point. When you touch the screen, the controller quickly detects a change in voltage or capacitance. It then converts this change into a set of numerical coordinates. These coordinates are calculated precisely in relation to the established origin point.

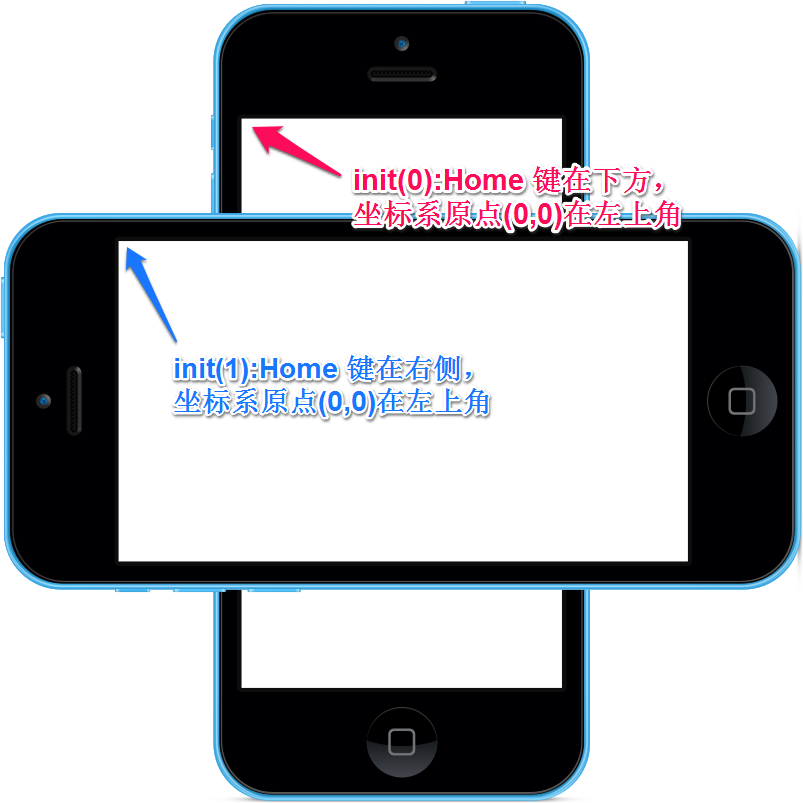
Physically, the location of the origin is not fixed. Many resistive touchscreens place the origin at the screen's upper-left corner, but this is not a universal rule. In practice, the origin could be at the lower-left, upper-right, or even lower-right corner. Its exact position typically depends on the screen's mounting orientation, the manufacturer's specifications, and the device's calibration settings. From a logical perspective, the origin is a fundamental computational reference. It ensures every touch location translates accurately into machine-readable commands, enabling seamless human-computer interaction.
Part 2: Core Functions: Why the Origin Point is Indispensable
Accurately setting the origin point fundamentally impacts touchscreen performance. Its roles are multifaceted and critical.
First, the origin enables precise coordinate mapping. The touchscreen itself perceives a raw coordinate system based on its own sensors. The display, however, operates on a completely separate pixel coordinate system. The core task of calibration is to build an accurate "translation bridge" between these two systems. The origin acts as the key anchor point for aligning these coordinates. It guarantees that the physical location of your finger touch perfectly matches the visual element (like an icon or button) you see on the screen. Without a correct origin, this mapping becomes skewed and unreliable.
Second, the origin guarantees intuitive and reliable interaction. Whether tapping an app icon, scrolling through a webpage, or performing detailed digital drawing, we expect the device's response to match our intent perfectly. A stable and accurate origin is the foundation for this "what you touch is what you get" experience. It directly determines touch positioning accuracy, preventing frustrating issues like "mis-taps" or "activating the wrong area."
Furthermore, the origin compensates for inherent hardware and environmental errors. Touchscreens face numerous challenges during daily use. Long-term repetitive pressing can cause slight wear on the surface layers of resistive screens. Changes in ambient temperature and humidity can affect the electrical properties of the sensor circuits. Additionally, minor mechanical tolerances may exist from the manufacturing and assembly process. Through a periodic or on-demand calibration routine, the system can recalculate and adjust the origin parameters. This process effectively counteracts the cumulative errors from these factors, helping the device maintain consistent performance throughout its lifespan.
Part 3: The Calibration Process: How to Set and Adjust the Origin
The process of setting the touchscreen origin is professionally termed "touchscreen calibration." This is not a simple parameter entry but a systematic procedure involving multi-point sampling and mathematical calculation. Here is a breakdown of the typical steps and their underlying principles.

Step 1: Access the Device's Calibration Mode
Methods to enter calibration mode vary greatly between devices. For industrial HMIs or specialized equipment, you often need to press and hold a specific screen corner (like the upper-left and lower-right) during startup. On Windows-based touch computers, users can usually find the option in the Control Panel under "Tablet PC Settings" or "Calibrate the Pen or Touch Input." Android devices may hide an engineering test menu, accessible by entering specific codes (like *#*#2664#*#*) in the dialer. Embedded Linux devices frequently use command-line tools from the tslib library, such as executing the ts_calibrate command.
Step 2: Perform Multi-Point Touch Sampling
Once in calibration mode, the system will display several clear calibration targets on the screen in sequence. The most common pattern is a five-point calibration, where targets appear at the four screen corners and the exact center. Some systems use a nine-point or even higher-point calibration to improve accuracy at the screen edges. At this stage, you must use a sharp, non-conductive stylus (never a finger or a blunt object) to press the exact center of each target. The system simultaneously records two critical data sets: the raw physical coordinates read by the touch sensor, and the known standard pixel coordinates of each target on the display.
Step 3: System Calculation and Parameter Storage
After collecting data from all sample points, the internal calibration algorithm goes to work. Using these data points, it calculates the optimal coordinate transformation parameters through mathematical methods like affine transformation or polynomial fitting. These parameters form a transformation matrix. This matrix can accurately map the raw sensor coordinates of any touch point to the correct screen pixel coordinates. Next, the device saves this newly calculated parameter set, which includes the calibrated origin information, into non-volatile memory. Consequently, the device can load the correct parameters on the next startup without needing recalibration every time.
Step 4: Reboot Verification and Subsequent Testing
After calibration completes, a device reboot is generally recommended to ensure the new parameters take full effect. Following the reboot, you should perform simple verification tests. Try tapping buttons at the screen edges, dragging icons, or attempting handwriting. This ensures the touch response remains accurate across all screen areas.
Part 4: Key Practical Considerations and Common Issues
To ensure optimal calibration results and user experience, keep the following key points in mind.
Using the correct calibration tool is essential. During the calibration process, always use the stylus provided by the manufacturer or a similarly sharp, non-metallic object. A finger has too large a contact area, which severely impacts the precision of the sample points. This can lead to poor calibration quality and might even make the touch experience worse.
Understanding the limits of calibration is equally important. Calibration software can correct systematic linear and offset errors, but it cannot repair physical hardware damage. If your touchscreen has visible scratches, dents, or shows areas of complete non-response or severe drifting that calibration cannot fix, the sensor itself is likely damaged. In such cases, the only solution is to contact a professional for repair or replacement of the touchscreen module.
Develop a mindset for periodic maintenance. For high-use public devices like kiosks or industrial control panels, or if the device experiences a significant change in its environment (temperature, humidity), proactively performing a touchscreen calibration is advisable. This preventive maintenance helps maintain interaction precision and prolongs the device's optimal performance.

In summary, the touchscreen "origin point" is a behind-the-scenes technical concept, yet it is the pivotal core for the entire touch interaction's accuracy. By understanding its principle and mastering the correct calibration method, users and technicians can ensure devices remain responsive and precise. This enhances both work efficiency and user experience. Good maintenance habits are the key to sustaining the reliable service of this sophisticated technology.